Project interface
Everything related to your project is saved in a single project file. The project file is where you develop and maintain the project roadmap. The roadmap organizes your project into phases. As you go through each phase, you add and complete the tools, forms, documents, and analyses you use to execute your project.
You use tools and forms to collect data about your project. For example, you can use a mapping tool to map the process that is failing, a brainstorming tool to capture possible reasons why the process is failing, and forms to analyze and document the steps you are taking to improve the process.
The following image shows an example of an Engage project that has a process map in the workspace.
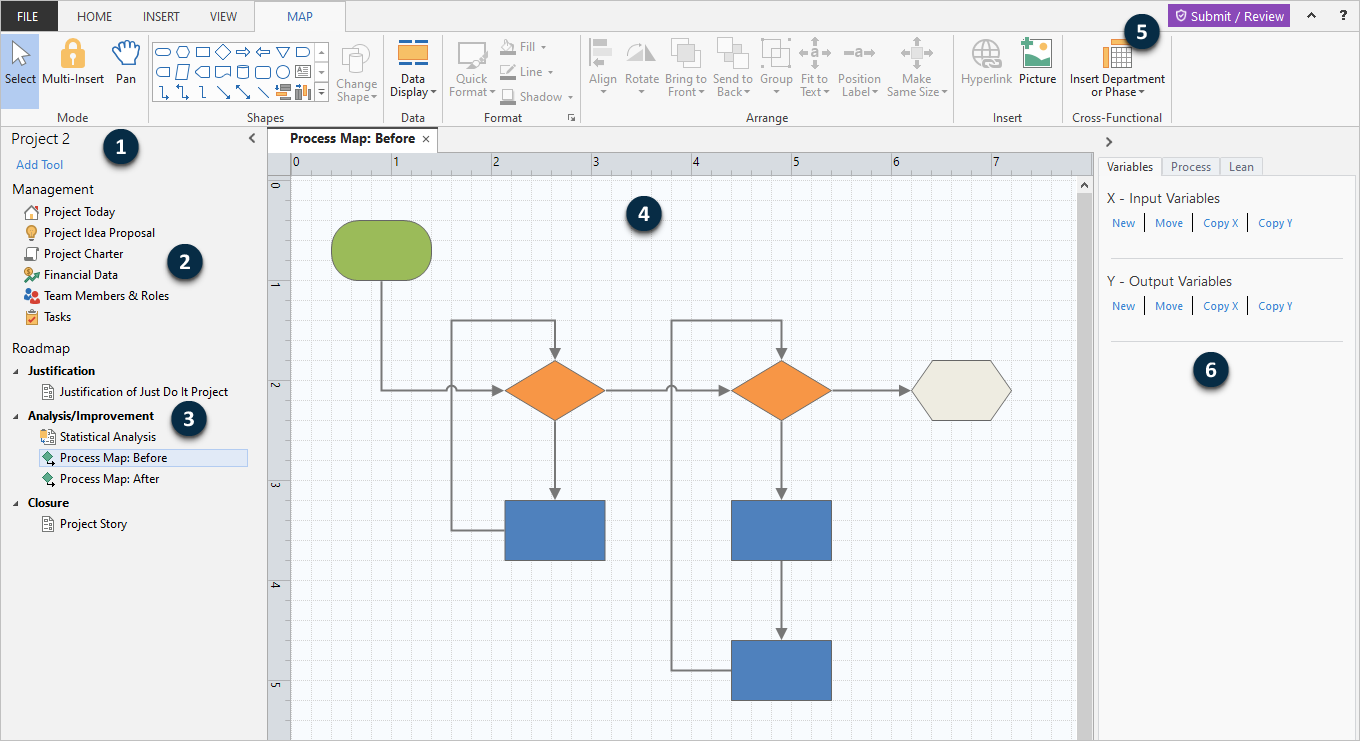
- 1: Navigator pane
- The area where you access the management tools and roadmap tools in your project.
- 2: Management section
- The set of forms in a project template that contain project data, such as Business Unit, Department, or Location, which are common to all projects. These forms ensure that project data is collected consistently across all projects so that dashboard reports are accurate. Only data architects can update, add, delete, and reorder forms in the management section. If you are a data architect, go to Update management forms.
- 3: Roadmap
- The area where you add tools and forms and organize your project into phases.
- 4: Workspace
- The area where you view and edit tools.
- 5: Submit / Review button
- The button you select to submit an idea or to submit a project for a phase review. If you are a steering committee member or a review board member, the button you select to approve or reject the idea or project.
- 6: Task pane
- The area where you interact with items in the workspace, for example, add data to shapes, apply formatting, and more.
Attach files to your project
You can attach non-Engage files or web pages to your project so you can directly access them.
Insert a Minitab project
- Choose . Engage opens a Minitab project and adds it to your Engage project.
-
Use
Minitab to analyze your data, then save your work
and exit
Minitab.
Engage
saves the latest version of your
Minitab project.
Note
When you rename a Minitab project, the new name is only displayed in Engage, not in Minitab.
Projects and workflow
When workflow is on, you can start a project as a workflow project or a non-workflow project. For more information about workflow, go to What is workflow?.
- To start a project that is part of the workflow review and approval process, you must first submit an idea. You can submit an idea in the web app or the desktop app. For more information, go to Create, submit, and view ideas.
- If your subscription is configured to allow non-workflow projects, you can start one from the desktop app. For more information, go to Start a non-workflow project (if available).
Upload desktop projects
- Workspace (.qcpx)
- Companion (.qcpx)
- Quality Companion 3 (.qcp)
- Open the Engage desktop app and sign in to your subscription.
- Choose .
- Navigate to the project location, select the projects to upload, then select Open.
- After the upload is complete, select Done.
- Choose .
- Select Browse to open and review the uploaded projects.
- Refer to the Archived Items folder in the roadmap for information about any legacy or custom data in the project.
Note
With desktop projects, data is managed locally. With an Engage subscription, data is managed globally. During the upload of desktop projects, any local data field that matches both the name and the properties of a global data field is mapped and included in dashboard reports. A local data field that does not map to a global data field is preserved as a local data field. To manage and include a local data field in dashboard reports, a data architect must recreate it as a global data field in the sandbox. For more information about data fields, go to What is a data field?.
Watch a video
Watch a video to learn more about projects.