In This Topic
- Add a value to the dropdown list in an existing list field
- Add data fields to an existing table
- Import data to a new table from an Excel file
- Create a new table from two tables with Mashup
- Create a new table from a connection to Microsoft OneDrive®
- Create a new table from an existing table with Custom SQL
Add a value to the dropdown list in an existing list field
-
Open the table, go to the Base tool
 , and
select the Setup tab.
, and
select the Setup tab.
-
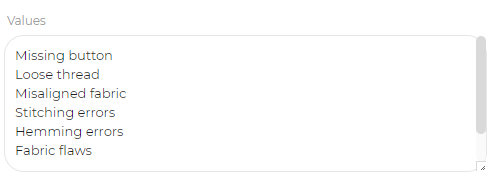
Find the appropriate list field and select the expander.

-
Scroll down to Values. Enter the values you want to add. Put each value on a separate line. You
can expand the length of the box by selecting and dragging the bottom right
corner of the box. For more information on the field settings you can
change, go to Field options for the Base tool.
Add data fields to an existing table
-
Select the Minitab Connect button
 to open the Navigation pane. Select Tables, and browse to the table to which you want to add a field.
-
Select the Base tool .
-
Select Click to add a field., and enter the information for the field in the box that appears
underneath. Select the expander to access additional settings for the field.
Import data to a new table from an Excel file
For this example, use the data set in the Minitab Data Set Library, Online Downloads Data.
-
From the Home screen
 , select the Minitab Connect button to open the Navigation pane. Under Tables, select Add New Table.
Or, from the Home screen, select the Add button under Tables.
, select the Minitab Connect button to open the Navigation pane. Under Tables, select Add New Table.
Or, from the Home screen, select the Add button under Tables.
-
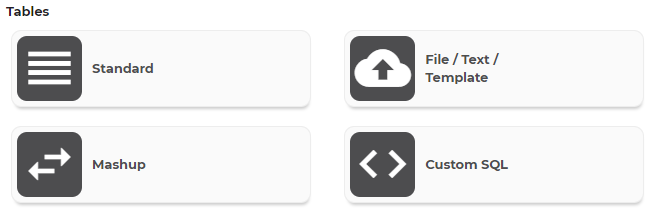
From the Tables gallery, select File / Text / Template.
-
Under Import Type, select File and select
 to browse to your file.
Note
Close the file before you import it. Minitab Connect only imports the first sheet of an Excel file.
- On the left side of the screen, type Online Downloads for Name. Select or type a Folder location.
-
Select Save
 .
.
Note
Select the Notifications button ![]() to display problems with your data. For instance, you can see whether the
data have been imported properly.
to display problems with your data. For instance, you can see whether the
data have been imported properly.
Note
After you import the file, the data in Minitab Connect is independent of the original data file. Therefore, changes made to one source will not affect the other.
![]()
Create a new table from two tables with Mashup
Use a mashup table to combine data from multiple tables. For example, suppose you upload measurements of parts at two different stages of the production into two separate Minitab Connect tables.
- From the Home screen, select the Add button under Tables. Give the table a name, such as Measurements Combined, and select folder in which to save it.
-
From the Tables gallery, select Mashup.
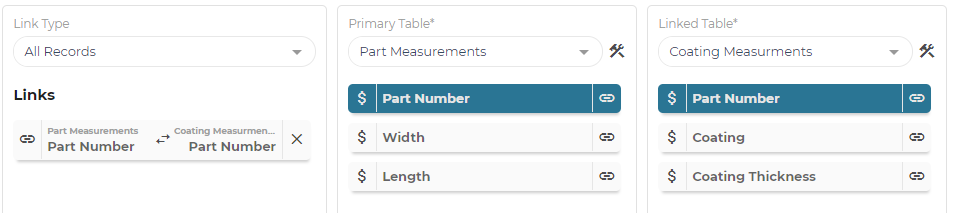
- From Link Type, select All Records under Horizontal. For more information on the difference between a horizontal and vertical mashup table, go to Mashup table options for the Base tool.
-
Select the pre-existing table Part Measurements for the Primary Table, and Coating Measurements for the Linked Table. The two tables share the field Part Number. Select the link
button
 beside the first
instance of Part Number, then select the check mark beside the second
instance. Save the table.
beside the first
instance of Part Number, then select the check mark beside the second
instance. Save the table.
-
The new table includes two identical fields, Part Number and Part
Number(1). To remove the second field, return to the Base tool and select the Advanced tab. Select the remove field button
 to gray out the Part
Number(1) field and save the table. When you return to the Prep tool, only one Part Number column appears.
to gray out the Part
Number(1) field and save the table. When you return to the Prep tool, only one Part Number column appears.

Create a new table from a connection to Microsoft OneDrive®
You want to set up a connection from Minitab Connect to the spreadsheet in OneDrive® and update the data every day at 7am. For this example, use the data set in the Minitab Data Set Library, Central shipping center data.
-
From the Home screen , select the Minitab Connect button to open the Navigation pane. Under Tables, select Add New Table.
Or, from the Home screen, select the Add button under Navigator.
- Add a Name for the table and select a Folder description.
-
In the list of galleries that begins with Tables and Analytics & Optimization, scroll to the Documents, Collaboration, File Sharing & Email gallery and select OneDrive.

- Under Connection, choose New Connection.
- Under Name, enter Central Shipping.
-
Select Authorize Microsoft Account and enter the
credentials for your account. Then select Save
.
- From Update Frequency, choose Daily. Select the calendar button under Hour/Minute, select 7am, and select OK.
- Under Drive, select the OneDrive connection that you just authorized. Select Next.
- Under File(s), select the folder you saved the Excel file in. Select Next. If your file is nested in multiple folders, you will have to do this step for each folder.
- Select the Excel file. In this case, select central.xlsx. Select Next.
-
Select Save
.
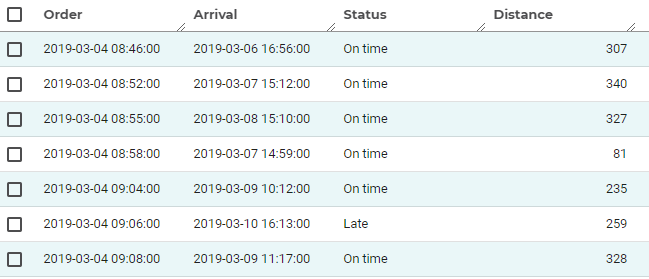
If you go to the Prep tool and select Run
![]() , Minitab Connect displays
the central shipping table.
, Minitab Connect displays
the central shipping table.
Create a new table from an existing table with Custom SQL
- From the Home screen, select the Add button under Tables.
- Add a Name for the table and select a Folder description.
-
From the Tables gallery, select Custom SQL.
- Add your SQL code. You can select Show Table List to add SQL from an existing table.
-
Select Run SQL to generate a preview of the table. When the table looks correct, select
Save
.