When you create an element for a form, you can add a rule to specify actions for when the form meets specific conditions. For example, a marketing service distributes a form that asks whether someone has an interest in sports. If the person selects that they are interested in sports, then the form reveals a field to ask for the person’s favorite sport.
To create a rule, select an action that changes the element, such as to show a hidden form element. Then, define one or more conditions for when to enact the rule. If multiple rules for an element conflict, Connect uses the last rule on the list.
Action
- Hide Form Element
- This action hides the element when the form meets the condition. Otherwise, the form
displays the element.
Note
The end user cannot see hidden elements. However, it is possible they could still access the data as it is sent to the client side.
- Show Form Element
- When you have an element that the form hides by default, this rule shows the element when the form meets the condition. To hide an element by default, select Hidden from the Options dropdown on the Element dialog. For more information on how to hide an element by default, go to Using the Form tool.
- Make Form Element Read Only
- This action locks the element when the form meets the condition. The user can interact with the element when the form does not meet the condition.
- Make Form Element Writable
- When you have an element that is read-only by default, this rule lets the user interact with the element when the form meets the condition. To make an element read only by default, select Read Only from the Options dropdown on the Element dialog. For more information on how to hide an element by default, go to Using the Form tool.
- Make Form Element Required
- This rule requires the user to interact with the element before they submit the form. For example, you can require that a text field is not empty. The element is optional when the form does not meet the condition.
- Make Form Element Optional
- When you have an element that is required, this rule makes the element optional when the form meets the condition. To require an element by default, select Required from the Options dropdown on the Element dialog. For more information on how to hide an element by default, go to Using the Form tool.
- Display Validation Message
- This rule flags the element and displays a message when the form meets the condition. The user cannot submit the form until the form no longer meets the condition.
- Set Value (Standard)
-
This rule changes the default value of an element when the form meets the condition. Once the form meets the condition, it will not revert back to the original default value, even if the form no longer meets the condition.
For example, the default value for Integer is 10. You set a rule that changes the default value to 5 when the Text element equals Yes. If the user sets Text to Yes, the default value changes to 5, but it will not change back to 10 if the user changes the Text element again.
- Set Value (Lookup Table)
- This rule changes the default value of an element based on the value of a row in a
saved table. For example, after a user enters their phone number, you can use the area
code in a lookup table to determine their location. Then you can add additional rules
to change the rest of the form to ask more specific questions about where they live.
Complete the following steps to specify the value.
- Specify a Connect table from Tables then select the saved view from View. For more information on how to create a saved view, go to Example of creating a data view.
- Specify the Key Column and enter a value for the Key. The key should be an observation in the field you specified in the Key Column. Connect identifies the row of the key.
- From Value Column, select the column that includes the default value. Connect uses the value in the row it identified in the previous step.
When
First, specify how many conditions must be true to implement the rule. Select All are true to implement the condition when all the conditions are true. Select Any are true to implement the condition when the form meets at least one condition.
- In the first dropdown, specify the element for the rule. You can specify the element that you are setting the rule on, or a different element on the form.
- In the second dropdown, specify the rule for the condition.
- In the third dropdown, specify the value for the condition.
For example, you select an element with the name Days Late. Then, you select Predicted Response. Last, you enter 10 for the value. The form implements the rule when the value in Days Late is greater than 10.
Select Add to specify multiple conditions.
Regex options
If you select Matches (Regex) or Does Not Match (Regex) from the second dropdown in the When section, you can specify Regex code. Specifically, you can create a capture group that saves the value from a form element. You can then use the value from the capture group in the current rule.
To reference the capture group in the rule, enter a dollar sign $ and specify the capture group in curly brackets. You can specify the capture group with a number that matches the order of the capture group. Or, if you specify a name for the capture group, you can enter the name in the curly brackets.
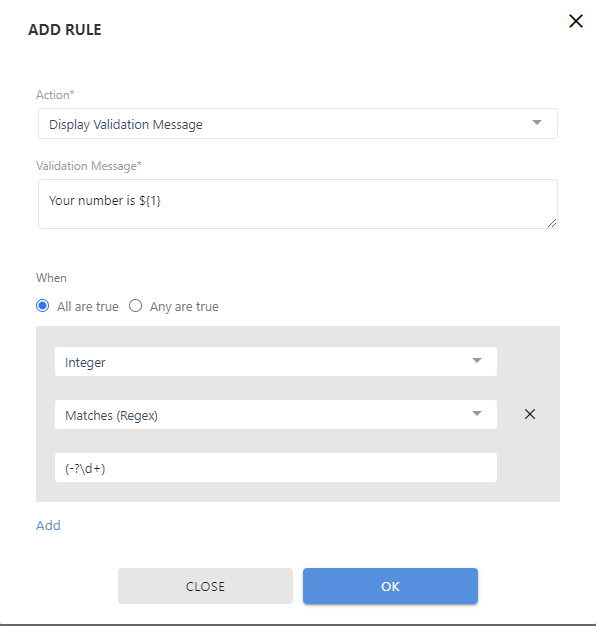
In this example, the Regex at the bottom of the dialog box captures the integer the user enters on the Integer element. Then the rule displays a validation message that references the integer.