In This Topic
- Create a custom menu
- Create a custom toolbar
- Display the names of commands on a toolbar
- Change the image on a toolbar button
- Move or remove a command from a menu or toolbar
- Create a custom command
- Create a command to run a Minitab macro or an Exec file
- Add a keyboard shortcut for a command
- Edit a context menu
- Change toolbar display options
- Restore the default settings
Create a custom menu
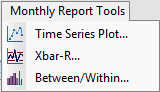
You can create a new menu for a special task or project. For example, create a menu of tools for monthly reports.
- Choose .
- On the Commands tab, from the Categories list , select New Menu, then from the Commands list, select New Menu.
-
While the
Customize
dialog box is open, drag
New Menu to where you want it to appear in the
Minitab interface. When the insertion point appears, release the mouse button.

- From the new menu's location in the Minitab interface, right-click New Menu and choose Name Button. Enter a name for your custom menu, for example, Monthly Report Tools, and click OK.
-
Add commands to your custom menu.
- In the Customize dialog box, click the Commands tab.
- On the Commands tab, from the Categories list, select a category, then from the Commands list, select the command to add.
- While the Customize dialog box is open, drag the selected command to your custom menu in the Minitab interface.
- Repeat step 5 until you add all the commands that you want to add to your custom menu.
- Click Close.
Create a custom toolbar
You can create a new toolbar for a special task or project. For example, create a toolbar of frequently used analyses where the names of the commands that you added are shown.
- Choose .
- In the Customize dialog box, click the Toolbars tab.
- On the Toolbars tab, click the New button.
-
Enter a toolbar name, for example,
My Tools, and click
OK.
Your custom toolbar is created in the center of your primary monitor.

-
While the
Customize
dialog box is open, drag your custom toolbar to where you want it to appear in
the Minitab interface, and when the insertion point appears, release the mouse
button.
The toolbar indicator
 appears to show the
location of your custom toolbar.
appears to show the
location of your custom toolbar.
-
Add commands to your custom toolbar.
- In the Customize dialog box, click the Commands tab.
- On the Commands tab, from the Categories list , select a category, then from the Commands list, select the command to add.
-
While the
Customize
dialog box is open, drag the selected command to your custom toolbar in the
Minitab interface, and when the insertion point appears, release the mouse
button.
- Repeat step 5 until you add all the commands that you want to add to your custom toolbar.
- Click Close.
Display the names of commands on a toolbar
You can show names for all the buttons on a toolbar or show the name for only one button.
Change the image on a toolbar button
You can change the image on a toolbar button.
- Choose .
-
While the
Customize
dialog box is open, complete any of the following tasks:
- To copy an image from one button to a different button, right-click the button to copy and choose Copy Button Image, then right-click the button to change and choose Paste Button Image.
- To edit the image on an existing button, right-click the button and choose Edit Button Image, use the color palette and the editing tools to edit the button image, then click OK.
- To display the button name instead of the image, right-click the button and choose Text. To display both button name and image, right-click the button and choose Image and Text.
- Click Close.
Create a custom command
You can create a custom command, for example, to open a different application or a website, or to run a Minitab macro.
To create a new command, you must first create it on the Tools tab, then from the Commands tab, you can move the new command to an existing menu or toolbar.
Create a command to open a different application or a website
You can create a custom command to open Minitab Engage™, a different Minitab product.
- Choose .
- In the Customize dialog box, click the Tools tab.
-
On the
Tools
tab, click the
New (Insert) button
 .
.
- Enter a name, such as Engage.
-
Enter the information for the command:
- In Command, enter the path or browse to the external application or web address for the tool (for example: C:\Program Files (x86)\Minitab\Minitab Engage\MinitabEngage 6.exe).
- If necessary, in Arguments, enter an argument to pass to the application that you are adding the link for, such as a specific file to be opened automatically by the application.
- If necessary, in Initial Directory, create an initial save folder for the application for which you are adding the link.
- Click Close.
- Choose to open the Customize dialog box again.
- On the Commands tab, under Categories, select Tools.
- While the Customize dialog box is open, drag the new command to where you want it to appear on the Minitab menu or toolbar.
- Click Close.
Create a command to run a Minitab macro or an Exec file
If you frequently use a Minitab macro or an Exec file, for example, to update data from a database, you can create a command to run the macro or the Exec file.
- Choose .
- In the Customize dialog box, click the Tools tab.
-
On the
Tools
tab, click the
New (Insert) button
.
- Type a name for the command, then press the Enter key.
-
Click the
Open
button
 .
.
- From the file type drop-down list, select All (*.*).
- Browse to and select the macro or the Exec file.
-
If the macro requires user's input when it is run, specify the
arguments that are required by the macro by entering columns, constants, or
matrices after
Arguments.
Note
You can specify only one set of arguments. If you want the macro to run with a different set of arguments, you must either modify the arguments for the shortcut or create a different shortcut with the other arguments.
For example, suppose you run a macro one time, and specify the 95th percentile as an argument, for example, C1 95 C10. Then, you run the macro again, and specify the 90th percentile, for example, C1 90 C11. Instead, you could create one shortcut named 95th Percentile using 95 as an argument, and another shortcut named 90th percentile using 90 as an argument. - Click Close.
- Choose to open the Customize dialog box again.
- On the Commands tab, under Categories, select Tools.
- While the Customize dialog box is open, drag the new command to where you want it to appear on the Minitab menu or toolbar.
- Click Close.
Add a keyboard shortcut for a command
Add shortcut keys to save time executing the commands that you use most often. For example, create a keyboard shortcut to open the 2-Sample t dialog box.
- Choose .
- In the Customize dialog box, click the Keyboard tab.
- On the Keyboard tab, from Category, select the category that the command belongs to, for example, Stat.
- Under Commands, select a command, for example, 2-Sample t...[Basic Statistics].
-
Click in the
Press New Shortcut Key
field, then press the keyboard shortcut, for example,
Ctrl+B.
If the keyboard shortcut is already assigned, Minitab displays a message.
- Click Assign and close the window.
Change toolbar display options
You can change how tooltips and icons for toolbars are displayed.
- Choose .
- In the Customize dialog box, click the Options tab.
-
On the
Options
tab, do any of the following:
- To display tooltips for toolbars, select Show ScreenTips on toolbars.
- To show shortcut keys in tooltips for toolbars, select Show shortcut keys in ScreenTips.
- To display large icons on toolbar buttons, select Large Icons.
- Click Close.
Restore the default settings
You can restore the default settings for menus, toolbars, and shortcut keys.
Reset a toolbar
These steps reset the buttons and display settings for non-custom toolbars. These steps do not affect custom toolbars. These steps do not affect which toolbars are visible.
- Choose .
- In the Customize dialog box, click the Toolbars tab.
- To reset one toolbar, click the toolbar, then click Reset.
- To reset all the toolbars, click Reset All.
- To remove a custom toolbar, select it from the Toolbars list and click Delete.
- Click Close.
Reset shortcut a key
These steps remove new shortcut keys and restore modified shortcut keys to their original function.
- Choose .
- In the Customize dialog box, click the Keyboard tab.
- To reset all the keyboard shortcuts that you changed, click Reset All.
- To reset one keyboard shortcut, select the command, click in Current Keys, and then click Remove.
- Click Close.