Visual Logic Tutorial
This example explains how to build Visual Logic code. It gives detailed instructions about how to input and edit Visual Logic.
The example is a process where a standard facility is supplemented by a backup facility at busy times.

and change the processing time at Activity 2 to 11 minutes.
Activity 3 is very expensive and so needs to be highly utilized so Activity 2 will be supplemented with additional help, but we will only use this when it would be useful to do so.
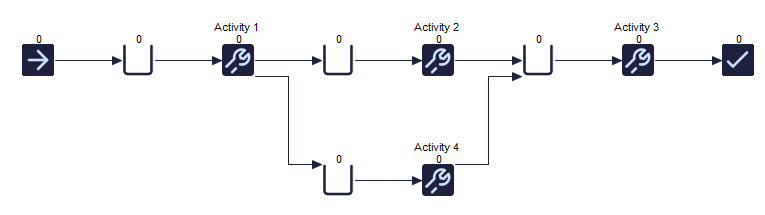
We are going to send work to Activity 4 from Activity 1 when there is not much work waiting at the important Activity (3) but only if Activity 2 is getting behind with its work (there is a queue of work at it).
Specifically, if there are less than 3 items waiting for Activity 3, and there is a queue at Activity 2, then we will send work to Activity 4 instead of 2.
Go to the Build tab and enter the detail dialog for Labels.
Add a Label and call it "Route to take" - we are going to use "Label Routing out" of Activity 1.
In the Label dialog click NEW to create a new Label and type in its name
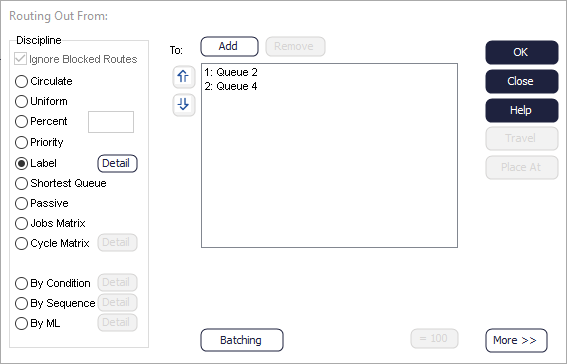
Now we have to add the Visual Logic code to set the Label to either: 1 (go to the first destination in the above list) or 2 (go to the second destination in the above list).
Click the On End button (you may need to click on the more button).
As the window says, click the RIGHT mouse button (in the window) to start adding Visual Logic.
The first thing to do is set the Label to the default value (1 = go to Queue for Activity 2).
- Double click the left hand side box.
- The formula editor appears. Select the OBJECT check box
- We want to set ROUTE TO TAKE - so double click it and then click OK.
- Now click the double click right hand side of the SET dialog. We are now back in the formula editor but this time we want a value.
- Type a 1 into the box and click OK.
- Click OK in the SET DIALOG too.
If you run the simulation with just this Visual Logic code it will behave as it did without Activity 4 because the Label will always be 1 (= go to destination 1).
Click the right mouse button again (in the Visual Logic code window) and add an IF line. The Conditional Block Editor will appear. (The Conditional Block Editor is also used to While and UNTIL blocks).
IF Queue for Activity 3.Count Contents < 3So, click the top box and use the formula editor to select OBJECT, QUEUE FOR Activity 3, COUNT CONTENTS. You need to click APPLY and OK to bring your selection back to the conditional block editor.
Use the formula editor to put a 3 in the bottom box and choose IS LESS THAN for the type of condition.
All Visual Logic lines that can have child lines automatically insert a dummy line when they have no children. If you click RIGHT when a line is highlighted new lines are inserted at the same level in the hierarchy. If you wanted to add a line at the same level as the SET and the IF lines (to be obeyed after the IF block) you would highlight (click on) the IF line first, then RIGHT click.
IF Queue for Activity 3.Count Contents <3
      IF Queue for Activity 2.Count Contents>3
            SET Route To Take = 2
Running the simulation like this will increase the utilization of Activity 3.
So far we have only looked at SET and IF lines. Loop lines are important because they let you perform operations a specific number of multiple times. Loops require a Global Data Item to be used to count to number of times the loop is performed. Create a Global Data Item in the Information Store- make sure the item you create can contain NUMBERS.
LOOP 1>>> My Counter>>> 5
      Add Work To Queue Main Work Item Type, Queue for Activity 3
This loop is used to add 5 Work Items to the Queue for Activity 5 when the simulation is reset.
As you change the command or click on parameters the text automatically changes to prompt you for the type of information required.