Set Up Version Control
Version Control can be extremely useful to keep track of changes and revert to previous versions when working alone or as part of a team. It can also let you collaborate on the same simulation, when working as part of a team. You can read more about using Version Control here.
You can use Version control for Simul8 in two ways. You can either make use of third-party tools such as Git and a Version Control interface of your choice or you can use Simul8's built-in Version Control interface.
Setting up Version Control using Simul8's built-in interface
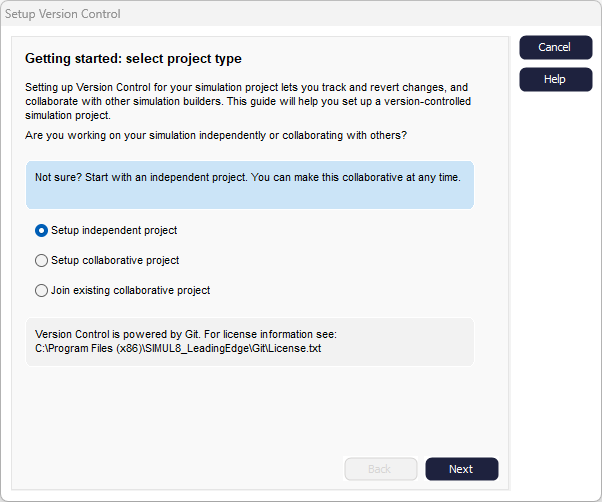
Step 1: Select project type
Before you can start using Version Control to manage your simulation, there are a couple of quick steps to set up some file locations. Simul8's setup dialog guides you through the required steps, one at a time.
The first step is to select if you are working on an independent or a collaborative project. Version Control can be extremely useful in both scenarios to track changes and easily revert to different versions. If you're not sure, start with an independent project, you can always make this collaborative at a later stage.
Regardless of whether you are working independently or collaboratively, you need to let Simul8 know where to save your simulation locally (on your own machine). If you are working collaboratively, you will also need a shared location that all contributors can access - more on this in the next step.
There is also a third option for if someone else has already set up a collaborative project with a shared location, and you want to join the project to work on the same simulation.
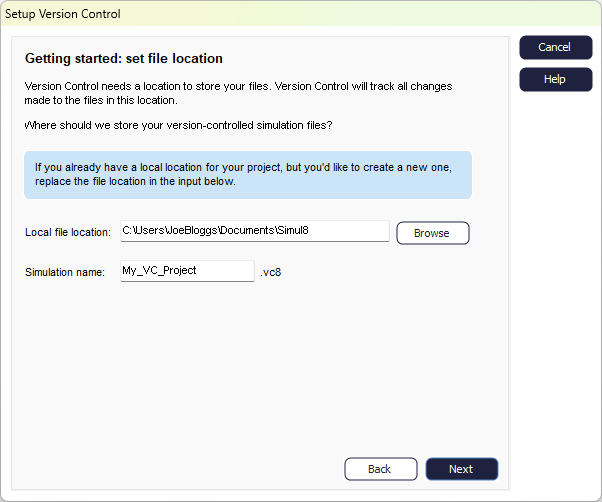
Step 2: Select location for your local working files
Regardless of which option you selected in Step 1, you need to select a location for your local working files. Simply, where will you save the simulation files on your local machine while you are working on them.
Enter the folder location or click Browse to open Windows File Explorer to select your chosen location.
You'll also need to enter a name for this simulation. If you have previously saved your file (using the standard .S8 save option outside of Version Control) then this will be pre-populated with the name already given - you can either keep this name or give it a new one.
Step 3
Step 3 will vary depending on which option you selected in Step 1.
- Setup Independent Project - If you are setting up an independent project, then you are done. You just need to confirm your options and click Done. Simul8 will take care of the rest, and you are ready to start using Version Control.
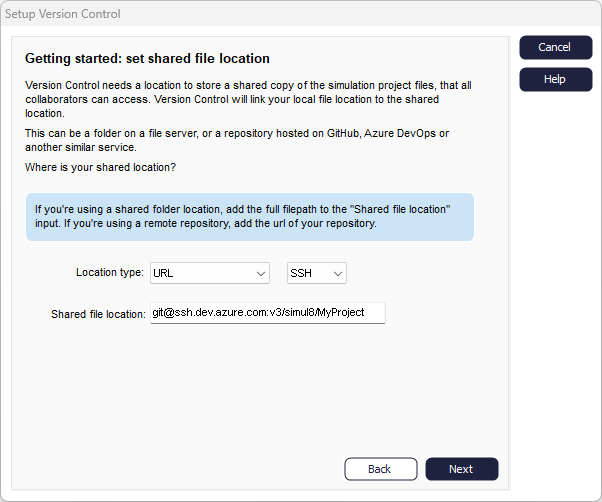
- Setup Collaborative Project or Join an Existing Collaborative Project - For a collaborative project, you also need to have a shared file location.
This can be in any location that can be accessed by all users who will collaborate on this project. There are services available specifically for this purpose such as Github and Azure Devops. In Version Control language these are called Remote Repositories. Remote because it is not on your local machine and Repository is just a software developer word for a central location to store data. You can connect to these locations using either an HTTPS or SSH connection.
You do not have to use one of these dedicated services though, a folder on a shared drive that all collaborators can access, will work just as well. We would recommend avoiding cloud backup locations such as OneDrive, Dropbox or SharePoint as these will try to back up and create their own versions of files which can cause access issues. You will also need to use a separate folder for each version-controlled simulation. If you select a location that is already being used, you will see an error on the final screen. If this happens, just click back and pick a new shared location. If you are in doubt about the suitability of a location, reach out to our friendly support team at Minitab Technical Support.
After you decide on your location, or if you are joining a collaborative project and your location was provided to you, select whether this is a folder or a URL location, and then enter the address.
You are ready to start working on your Version Controlled Simul8 project. See Use Built-In Version Control Tools for more information on how to use this feature.
Setting up Version Control using a third-party tool
By default, Simul8 will save your file as a Simul8 Simulation file type (.S8). You can choose to also save as other file types, including Simul8's Version Controlled XML (.VC8).
To use Version Control with third-party tools, you will need to save your simulation as a Version Controlled XML (.VC8) file. You can then save this file to an existing repository, or setup a new one specifically for this simulation.
Beyond creating a .VC8 file, Simul8 does not provide any guidance on using third party tools. If you need any further guidance with these tools, search for support on these specific tools or use Simul8's built-in Version Control interface.