In This Topic
Step 1: Examine the Acceptance I chart to determine whether shifts in the process mean are acceptable
The Acceptance I chart plots individual observations. The center line is an estimate of the process average. The acceptance control limits are based on the specification limits, the accepted percentage outside each specification limit, the probability of intervention, and the estimated process variation. The chart displays a lower acceptance control limit, an upper acceptance control limit, or both, depending on which specification limits you enter.
Red points indicate observations that fail Test 1 because they are outside an acceptance control limit. A point outside an acceptance control limit indicates that the process mean shifted far enough toward the corresponding specification limit that the accepted percentage of process output outside the specification limit might be exceeded.
Shifts in the process mean that remain within the acceptance control limits do not indicate that the accepted percentage is exceeded. If the chart shows an out-of-control point, investigate whether an additional cause or an increased effect from an existing cause produced the shift.
Out-of-control points can influence the estimates of process parameters and prevent control limits from truly representing your process. If out-of-control points are due to special causes, then consider omitting these points from the calculations. For more information, go to Specify how to estimate the parameters for Acceptance Individuals Chart.
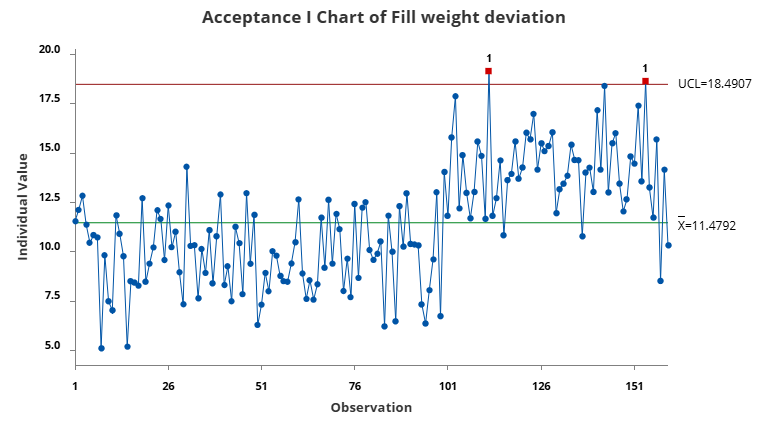
Two observations are above the upper acceptance control limit. These points indicate that the process shifted far enough toward the upper specification limit that more than 1% of the process output might exceed the specification limit.
After observation 100, the process mean shifts upward, but most observations remain within the upper acceptance control limit. The engineer should investigate the two out-of-control observations to determine whether the shift reflects an additional cause or a stronger effect from an existing cause. Possible causes include a machine adjustment, a change in raw material, an operator change, or a different production lot.
Step 2: Identify which points failed the test
Investigate any observations that fail Test 1. On the Acceptance I chart, Test 1 identifies observations that are outside the acceptance control limits. The test results in the output identify all the points that failed the test.
Test Results for I Chart of Fill weight deviation
| TEST 1. One point outside of acceptance control limits. |
|---|
| Test Failed at points: 112, 154 |
