Data prep options
In This Topic
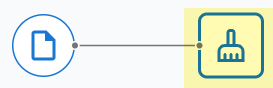
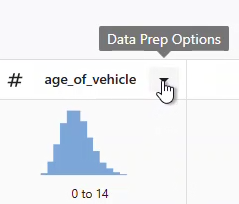
Open Data Prep Options
Sort columns
To sort the data by a column, select Sort Ascending or Sort Descending from the Data Prep Options dropdown menu.
To sort by several columns at the same time, select Advanced Sort for the first column. Then add additional columns in their sort order.
Sorting columns require that all data columns have the same number of rows. If the column lengths are unequal, you will be prompted to make them equal to proceed.
Change column data type
- Change a numeric column to text or date/time.
Note
Numeric columns can have one of the following types: Automatic (Numeric), Integer, Decimal, Currency, or Percentage.
- Change a text column to numeric or date/time.
- Change a date/time column to numeric or text.
Select Retain full precision to keep numeric precision. In the data grid, the numeric value displays as formatted, but the full precision value is retained to pass to other applications.
Deselect Retain full precision to round the value as formatted. Formatted, not precise values, are passed to other applications.
For more information on data types, go to Types of numeric data.
Rename column
To rename a data column, select Rename from the Data Prep Options dropdown menu.
- Use unique names.
- Use names between 1 and 31 characters.
- Use names without the following characters: # '
- Use names that do not start with the following character: *
Note
If you rename a column in the Data Center that connects to an asset in a Dashboard, the asset will not update.
Reorder columns
To change the order of the columns, drag and drop the selected columns or use the keyboard arrow keys.
Drag columns
To organize the order of one or more data columns, select Reorder Columns from the Data Prep Options dropdown menu.
- Single column selection
- Select the drag handle or anywhere in the row to select the column to reorder. The entire row that contains the column name can be moved.
- Multiple column selection
-
- Select the first column, then press and hold the Shift key to select the last column. All columns between the first and last columns are selected.
- Then, drag the block of selected columns to the new insertion point.
- Release the mouse to insert the columns.
Only adjacent columns can be selected for multiple column selection.
Use keyboard shortcuts to reorder columns
To organize the order of one or more data columns, select Reorder Columns from the Data Prep Options dropdown menu.
- Single column selection
-
- Tab into column list, then use the keyboard arrow keys to select a single column.
- Use Enter, Return or Space to select the column.
- Use the keyboard arrow keys to position the column.
- Use Enter, Return or Space to insert the column.
- Multiple column selection
- Use Shift + Up/Down Arrow to select multiple
columns. Use Enter,
Return or Space to
select and move the columns.
Only adjacent columns can be selected for multiple column selection.
Filter rows
To filter the rows of data to meet a condition, select Filter Rows from the Data Prep Options dropdown menu.
- Numeric filter options
-
- equals
- does not equal
- greater than
- greater than or equal to
- less than
- less than or equal to
- is missing
- is not missing
- Date/time filter options
-
- equals
- does not equal
- is after
- is after or equal to
- is before
- is before or equal to
- is missing
- is not missing
- Text filter options
-
- equals
- does not equal
- contains
- does not contain
- is missing
- is not missing
- begins with
- does not begin with
- ends with
- does not end with
You can also select and right-click an individual value within a cell to exclude or show only that value. In the case of missing values, you can show missing values or show non-missing values.
Filtering rows require that all data columns have the same number of rows. If the column lengths are unequal, you will be prompted to make them equal to proceed.
Note
If you filter rows in the Data Center and sync your data, the Dashboard assets update.
Remove duplicate rows
Note
This step keeps one row from each set of duplicates and removes the remaining matching rows. If you need to keep a specific duplicate record, review or sort the data before you remove duplicates. You cannot select which row to keep in this dialog box.
- All values in the row
- All values in the row removes rows only when every value in the row matches. Use this
option to remove exact duplicate records.
For example, these rows are duplicates:
Name State Status Taylor Oregon Active Taylor Oregon Active These rows are not duplicates because the Status values differ:
Name State Status Taylor Oregon Active Taylor Oregon Inactive - Values in selected columns
- Values in selected columns removes rows when the values in the selected columns match. Use this
option to find records that share a key value, such as an email address,
account number, or order ID. Specify the columns in Columns. Only the selected columns determine whether rows match. Values in
other columns do not affect whether rows are duplicates. Select enough
columns to distinguish records that should remain separate.
For example, if you select only Email, both rows below are considered duplicates even though their Status values differ:
Email Status taylor@example.com Active taylor@example.com Inactive
Create categories from column values
To create categories from numeric ranges or text values, select Categorize Data from the Data Prep Options dropdown menu.
- Use numeric categories when you want to group numeric values into meaningful ranges, such as inspection bands, risk levels, or time intervals.
- Use text categories when you want to combine similar values, standardize labels, or reduce the number of unique values in a column.
Numeric example
- Children: Age < 18
- Young Adult: 18 ≤ Age < 25
- Adult: 25 ≤ Age < 65
- Senior Citizen: Age ≥ 65
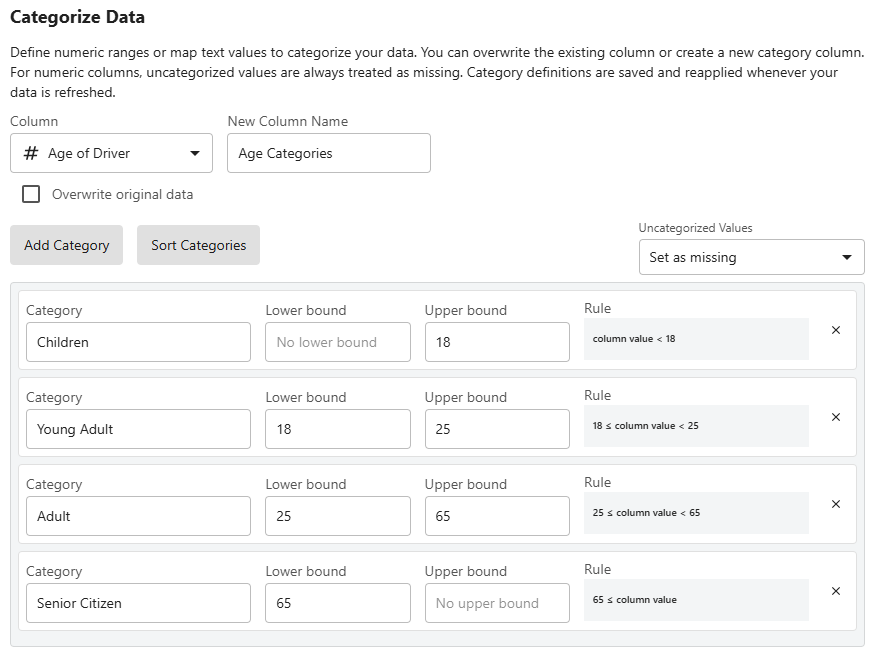
Ages are categorized into a new column. Any uncategorized values are set to missing values.
Text example
Supplier Type and
contains the values Raw materials, Packaging,
Components, Logistics, and
Warehousing. You can create the following categories:- Production:
Raw materials,Components - Support:
Packaging,Logistics,Warehousing
After the step runs, values that match Raw materials or
Components are categorized as Production.
Values that match Packaging, Logistics, or
Warehousing are categorized as
Support.
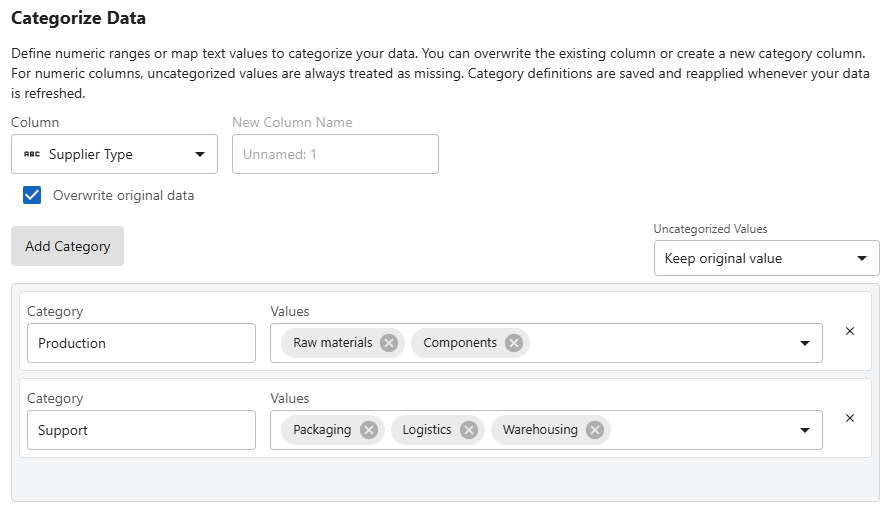
Values are categorized and overwrites the same column. Any uncategorized values are kept as the original values.
Sort categories in numeric order
Select Sort Categories to change the order of the categories. Category order can affect how categories appear in downstream summaries, graphs, and dashboards. Sorting functionality is only available for numeric columns.
Handle uncategorized values
Use Uncategorized Values to specify how this step handles values that do not match a category.
- For numeric columns, uncategorized values are always treated as missing.
- For text columns, select one of the following options:
- Keep original value: Values that are not assigned to a category remain unchanged.
- Set as missing: Values that are not assigned to a category become missing values.
For example, if Maintenance appears in Supplier
Type but is not assigned to a category, then this step either keeps
Maintenance in the column or sets the value to missing,
depending on the option you select.
Edit or delete categories
To edit a category, change the category name, bounds, or mapped values. The rule updates automatically.
To remove a category, select Delete Category
 next to the
category. Values that matched the deleted category become uncategorized.
Merge columns
To merge several columns into a single text column, select Merge Columns from the Data Prep Options dropdown menu.
You can merge up to six columns. The new merged text column is added to the end of the columns.
Merging columns require that all data columns have the same number of rows. If the column lengths are unequal, you will be prompted to make them equal to proceed.
Split a text column
To split an existing text column into a series of new text columns, select Split from the Data Prep Options dropdown menu.
To define a split operation, enter a delimiter value as the list separator. By default, the default delimiter value is a comma.
Note
You can create a maximum of 11 new columns from an existing column. If a column contains a list of more than 10 separated values, only the first 10 indexed values are placed into separately created columns. The remaining list items are grouped together into a separate column (the 11th column).
Extract text values from a column
To extract specific text values from an existing text column into a new text column, select Extract from the Data Prep Options dropdown menu.
- Start and end index extracts values that include the first and last index value that you
specify and all values in between.
Suppose you have a date and location code for each invoice identifier and want to extract the month, 20250415PR. In Start Index, enter 5. In End Index, enter 6 for the 2-digit month code, in this case 04.
- First N characters extracts the first characters from the string.
Suppose you have a date and location code for each invoice identifier and want to extract the year, 20250415PR. In Number of Characters, enter 4 for the 4-digit year code, in this case 2025.
- Last N characters extracts the last characters from the string.
Suppose you have a date and location code for each invoice identifier and want to extract the location code, 20250415PR. In Number of Characters, enter 2 for the 2-digit location code, in this case PR.
- From list extracts values between the starting and ending index values.
Suppose you have location information that includes county, city, state, and zip code, and you want to extract the city, Jefferson County, Arvada, CO, 80003. In List Delimiter, enter ,. In Extract at Index, enter 2 for the city, in this case Arvada.
Replace values in a column
To find and replace non-missing and missing text and numeric values that are contained in the specified column, select Replace Values from the Data Prep Options dropdown menu or the column context menu. The validity of the find value is determined by the column's data type and user's regional settings.
- Require letter casing to match the find value.
- Require an exact match to the find value. This means that the whole word needs to match in order to replace the value.
Prepend or append values to data values
To add characters to the beginning or end of contents in text columns, select Prepend or Append Values from the Data Prep Options dropdown menu.


Note
Append works the same way, but places the text at the end of the data values.
Apply capitalization rules to values in a column
- Uppercase capitalizes all letters. For instance, SALES ASSOCIATE.
- Lowercase does not capitalize any letters. For instance, sales associate.
- Proper case capitalizes the first letter of each word. For instance, Sales Associate.
- Sentence case capitalizes the first letter of the first word. For instance, Sales associate.
Delete column
To delete a data column, select Delete Column from the Data Prep Options dropdown menu. You can also select the column and press Delete on the keyboard. To select a column, select the column title cell or the column summary cell.
Calculated columns
Open Add column then select Calculated Column. You can type an equation or insert functions and columns.
Basic syntax information for supported functions is given in the following sections. For more information, go to Equation syntax and functions.
